
Table of Contents
- Excerpt
- Tools and Materials/Parts List
- Quick Part Specifications List
- Safety Warnings
- Step-by-Step Instructions
- (1) Sprayed the mower off with the Power-Jet in the Driveway
- (2) Moved mower to back yard and attempted to scrape off bottom
- (3) Removed Old Blade and put on New Blade
- (4) Remove the Oil and Add New
- (5) Let’s get Ready to Change the Air Filter
- (6) Removed Old Spark Plug and Replace with a New Spark Plug
- Additional Items Found
- Final Review
Excerpt
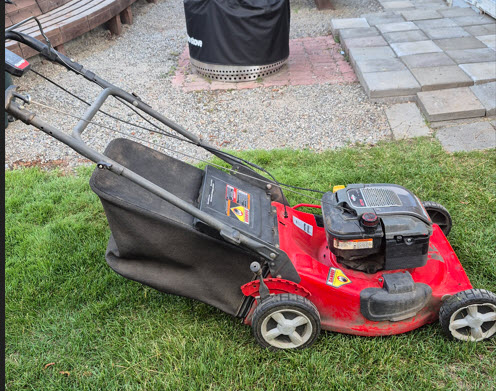
Instead of panic buying a brand-new model, I decided it was time for some classic DIY resuscitation. If you have a trusty Snapper Push Mower that’s currently a 2009 model or older, don’t give up on it yet. Here is a quick checklist of what we did to the get this red self-propelled machine ready for years more of service. No more limping for quite a while, I believe. I am the first one to admit I have veered way off track on the Maintenance Chart in the Snapper Safety Instructions & Operator’s Manual.
- Took off the grass catcher/bag and inspected it. Found a small crack and covered with a bit of Gorilla tape.
- Power washed the mower with a power wash Turbo Jet hose attachment.
- Disconnected the Spark Plug
- Inspected the under-carriage and scraped it off. Also discovered a small rusted out spot. Temporarily patched it after everything else was done.
- Tilted the mower on its side and scraped off the bottom and installed a new 21 inch mower blade.
- Removed old Tar like oil and added new oil.
- Replaced the air filter, which I believe may have been the original.
- Replaced the Spark Plug.
- Attempted to restart the mower with new gas. It started on the second try, which was a major improvement. It also didn’t sound like it was breathing through a clogged filter anymore.
Let’s get this started
Tools and Materials/Parts List
Detailed Tools Needed
“As an Amazon Associate, I earn from qualifying purchases.”
Some of the following Tools may have Amazon Affiliate links
(1) Socket Set

I like this more compact Socket set. (The Drive is 3/8”) It allows me to easily grab it to go, or it can be added to a tool kit. I used the wrench with a 9/16” socket to remove the mower blade. I used a 13/16” Spark plug socket with the wrench to take off the old spark plug and put on the new one.
“Check Price on this 34 piece DeWalt Socket Set”
(2) Spark Plug Sockets

This Stanley set has the three most common sizes (5/8”, 3/4”, and 13/16”) with the foam padding on the inside. I used the 13/16” inch with my socket set. The drive is 3/8”. I searched far and wide for this, but could not find the exact one, so will list what I believe to be a comparable set.
“Check Price on a Comparable set”
(3) Optional Spark Plug Gap Wire

Although I do not have one of these, it would be useful if the Spark Plug was going to be re-used after cleaning and gap checking. In my case the Spark Plug has not been replace or cleaned in at least five years. The Spark Plug for the Snapper has a Spark Plug Gap rating of 0.030 in (0.76 mm)
“Check Price on this Spark Plug Gap Wire”
(4) Optional Torque Wrench

This is an Amazon photo. I do not have one of these either. It could be useful if you need to have exact torque on the Lawn mower Blade Bolt (Blade Cap Screw) and the Spark Plug. The Blade Bolt on the Lawn Mower is rated at 40 ft. lbs… The Spark Plug Torque is rated at 180 lb-in (20 Nm). This set appears to have both covered and it is a reasonable price. Plus, I really want one of these.
“Check Price on this Torque Wrench Set“
(5) Bolt and Nut Loosening Oil (3-in-one High Performance Penetrating Spray)

Love this stuff. I have had great luck using it on sticky rusty parts, spraying bolts to help loosen. It also works great on Locks that have a little rust and are getting harder to use. If a bolt or washer is a little rusty, I will spray it with some before putting it back on. Found basically the same item on Amazon with a 12 pack of 4 oz bottles, which should work just fine.
“Check Price for Comparable Find“
(6) Siphon Pump for Oil or Gas

The Arnold Siphon Pump has been helpful a number of times when changing oil in the Mower and the Snow Blower. However if the Mower is cold, I cannot get any oil out with this. It is very good for draining gas tanks for storage in summer or winter also. I came up with a different strategy that I used to get the oil out. I will mention it with more detail as I get closer to siphon. I found a very similar siphon with an attachment for smaller diameter hole.
“Check Price for Comparable Siphon Pump“
(7) Oil Storage Pan

Really like this style of Pan. I have used it to change oil in several vehicles, lawn mowers, and snow blowers. You can change oil several times before it gets to full. It will hold 16 quarts and the brand is Scepter. There are a number of similar brands out there. This is the one I use. Lastly, the can is easy to carry with the handle. It can be stored laying down this way or stood up. I like the standing configuration myself. I was not able to find this exact pan, but found two that could be comparable.
“Check Price of First Comparable Pan”
“Check Price of Second Comparable Pan”
(8) Gas Can(s)

Use two main Gas Cans for mowing. The left one is a 5-Gallon Gas can and the right one is a 2-Gallon Gas Can. There are a lot of different styles and sizes available. If you prefer metal, those are available also. I didn’t see these exact cans online, but found two that I think are interesting.
“Check Price for Comparable 5 Gallon Can“
“Check Price for Comparable 2 Gallon Can”
(9) Gas Protector (STA-BIL)

I always try to put STA-BIL gas stabilizer in the gas cans not long after getting new gas to allow it last longer. It is especially good to do if storing some of the gas over winter. The Snapper mower is not as picky about the gas, but some of the other gas tools can be fickle about it, especially one of chain saws.
“Check Price of the STA-BIL Fuel Stabilizer”
(10) Paint Scraper for bottom of Mower

This is just a paint scraper/putty knife. It is stainless steel, so should not rust as easy. It works great for digging stubborn chunks of grass from under the mower desk. Found a Comparable one.
“Check Price of a comparable paint scraper/putty knife”
(11) Dust Off Duster Can

There are a ton of uses for the Dust Off Duster Cans. We usually order a six pack. Great for ‘blasting’ off tools to help clean them off, clean tools, clean up a sanding area, blowing the dust off a bunch of different electronics.
“Check Price on this 6 pack of Dusters”
(12) Power Spray Washer for Hoes – Turbo Jet

This handy washing tool can really blast off dirt and grime. Just hook it to your hose and the valve can be used to turn it off or on. It is in the on position in the photo. Found a Comparable one almost identical to this one.
“Check Price of a Comparable ‘Turbo Jet’”
(13) Standard Screw Driver

Just a standard fairly long Husky Screwdriver. Screwdrivers have lots of uses. Any large standard screws can be removed with this. Used for taking off the Air Filter Cover. I Found a Comparable Screw Driver in a nice little set of Different sizes. I have a number of different brands, but a good one with a nice big handle works best for me.
“Check Price a Comparable Screw Driver (set)”
(14) Special Funnel

I came up with a very useful idea using this funnel. Normally it can be used to put in the oil, which we did. However, jamming it into the hole the oil goes in, then tipping a bit allowed the oil to be removed with no dripping into a clear cup or the opening of the oil drain pan. I found a comparable version that is very similar to this one.
“Check Price of Comparable version”
(15) Shop Cloth Towels and Shop Paper Towels

I often use a combination of the regular shop cloth towels and the paper variety. Both can be useful, I believe, but I found a decent compromise between the two so two different types would not be needed.
“Check Price for a Compromise between the two Towels”
Detailed Materials/Parts List
“As an Amazon Associate, I earn from qualifying purchases.”
Some of the following Materials/Parts may have Amazon Affiliate links
(1) Spark Plug RJ19LM or Equivalent Specifications
Briggs and Stratton RJ19LM Equivalent At-A-Glance

- Thread Size: 14mm
- Reach: 9.5mm (3/8″)
- Hex Size: 21mm (13/16″) – Spark Plug Socket Size
- Factory Gap: 0.8mm (0.030″) – Gap to check if cleaning and re-using the existing Spark Plug
- Seat Type: Flat (Gasket)
- Core Material: Copper Plus
Tip: I want to emphasize the “R” in RJ19LM. If the machine has electronic components or safety switches, using the Resistor type (“R”) prevents electrical noise from messing with the equipment!
“Check Price for a set of 2 of these Spark Plugs“
(2) Air Filter Specifications
Snapper 21″ (Briggs & Stratton) Air Filter Cheat Sheet

- Filter Style: Oval, Pleated Paper (with Foam Pre-Cleaner)
- OEM Part Number: Briggs & Stratton #591583 (Replaces old #796032)
- Pre-Cleaner Part Number: Briggs & Stratton #697292
- Primary Dimensions: 4″ Length x 3.25″ Width x 4″ Height
- Best For: 21 cu. in. Vertical Shaft OHV Engines (EXi Series, Professional Series)
- Replacement Interval: Every 25 hours of use or once per season.
Tip: Never blow out a paper filter with compressed air. A lot of old-school garage guys do this to “clean” them, but high-pressure air tears microscopic holes in the paper media. This allows fine dust right into the carburetor, which will quietly destroy the engine from the inside out. If it’s caked in dirt, spend the $6 to $12 to replace it!
“Check Price on this Air Filter”
(3) Oil SAE 30 Specifications
Snapper 21″ (Briggs & Stratton) Oil Quick Specs

- Oil Type: SAE 30 Small Engine Oil
- Crankcase Capacity: 18 to 20 ounces (Approx. 0.55 to 0.6 quarts)
- Recommended API Service Class: SJ, SL, or higher
- Operating Temperature Range: Best for 40°F to 100°F+ (Warm weather mowing)
- Check Interval: Before every single use
- Change Interval: Every 50 hours of use, or once per season (springtime is best)
Tip: How you check the oil matters. On almost all modern Briggs & Stratton engines, you are supposed to wipe the dipstick clean, insert it back into the tube, and screw it all the way down before pulling it out to read the level. If it is just dipped without screwing it in, you will get a false low reading and accidentally overfill the engine!
“Check Price for this Comparable 6 Pack of SAE 30 Oil”
(4) Gas Specifications
No Image for Gas, but some good information and tip.
- Fuel Tank Capacity: 1.6 Quarts (1.5 Liters / 0.4 Gallons)
- Octane Rating: Minimum 87 Octane (87 AKI / 91 RON)
- Maximum Ethanol Content: 10% (E10) or lower
- Banned Fuel Types: Do NOT use E15, E85, or Flex-Fuel blends.
- Fuel Type: Regular Unleaded (Do not mix with 2-cycle oil) – Use a good Regular Unleaded Gas
- Freshness Lifespan: 30 days max (unless treated with a fuel stabilizer)
Tip: I was told if you want to eliminate gas issues entirely, you can buy canned, pre-blended 4-cycle fuel (like TruFuel or VP Racing) at local home improvement stores. It is completely ethanol-free, high-octane, and stays fresh inside a mower tank for up to two years without degrading. It costs more per quart, but it could save hundreds of dollars in carburetor repair bills or replacement over the life of the Snapper!
(5) New Lawn Mower Blade and Specs
Snapper 21″ Non-Thatching Blade At-A-Glance.

- Blade Length: 21 inches (Actual measurement is usually 20-15/16″ to clear the deck)
- Blade Type: Standard / High-Lift (Non-Thatching, Non-Mulching)
- Factory Replacement Blade: Snapper #7100242AYP (21″ Lift Blade)
- Center Hole Design: Air-Lift Circle with 2 Outer Bolt Holes (Mine does not have the two outer holes)
- Center Hole Diameter: 3/8 inch (Outer holes are 5/16 inch)
- Best For: Clean bagging, high-vacuum side discharging, and standard finish cuts.
Tip: Blade orientation. On a Snapper, it is incredibly easy for a DIYer to accidentally bolt the blade on upside down. Look for the stamp on the metal: factory Snapper blades almost always have the words “GRASS SIDE” or a part number stamped directly into the steel. (Notice the Red arrow. That side is to the grass) the stamp must face the dirt, not the engine! This was a difficult find, but I believe I found a Comparable Blade.
“Check Price of a Comparable 21” Blade”
(6) Snapper Lawn Mower and Specs
2009 Snapper 21″ Mower (Model 7800179 / SPV21675) At-A-Glance

- Mower Type: Walk-Behind, Self-Propelled, Variable Speed
- Deck Design: 21-Inch Rear Discharge (RD) Steel Deck
- Engine: Briggs & Stratton Quantum 675 Series (Model 126T02)
- Fuel Capacity: 1.6 Quarts (0.4 Gallons) of 87 Octane (Max 10% Ethanol)
- Oil Capacity: 18 to 20 oz. of SAE 30 Small Engine Oil
- Spark Plug: Champion RJ19LM (Gap: 0.031″ / 0.8mm)
- Factory Replacement Blade: Snapper #7100242AYP (21″ Lift Blade)
- Drive Belt Part Number: Snapper #7100883 (Traction Drive Belt)
Tip: Since this is a 2009 model, I discovered that many of the parts catalogs online will show component numbers with a “YP” or “AYP” slapped onto the end of the old part numbers (for example, 7100242 becomes 7100242AYP). I discovered this stands for “Yarnall-Panas,” an inventory coding update implemented after Briggs & Stratton acquired the Snapper brand. The parts are completely identical and will fit perfectly!
“Check Price on Newer Comparable Snapper (Electric)”
Quick Part Specifications List
Tip for Readers: We found that our Snapper mower we have was paired with Briggs & Stratton engine. Double-check your engine shroud, but the specs below cover the most common Briggs & Stratton setups found on classic 21″ walk-behinds.
| Component / Part | Specification / Size | Torque Rating |
| Blade Center Bolt | 9/16″ Hex Head | 40 ft-lbs |
| Spark Plug Socket | 13/16” Spark Plug Socket | 180 lb-in (20 Nm) |
| Spark Plug Gap | 0.030″ (0.76 mm) (Standard Briggs) | NA |
| Engine Oil Capacity | SAE 30 or 10W-30 (18 to 20 oz) | N/A |
| Fuel Tank Capacity | 1.6 Quarts (1.5 Liters / 0.4 Gallons) | N/A |
| Air Filter Type | Pleated Paper or Foam (Model 797301) | N/A |
NOTE: Significance of 180 lb-in (20 Nm)
The specification of 180 lb-in (20 Nm) indicates the recommended amount of torque to apply when installing a spark plug in a mower. This measurement serves several important purposes:
- Prevents Over-tightening: Applying too much torque can strip the threads in the engine, leading to costly repairs.
- Ensures Proper Seal: Correct torque helps create a tight seal, which is essential for optimal engine performance and efficiency.
- Maintains Performance: A properly installed spark plug ensures reliable ignition and efficient combustion, contributing to the overall performance of the mower.
Safety Warnings
“As an Amazon Associate, I earn from qualifying purchases.”
Some of the following Safety Equipment may have Amazon Affiliate links
Always wear Safety Gloves
(1) Safety Gloves (Kinco)

These are my favorite type of cowhide/leather gloves to use for a wide variety of items. As you can see the left pair has been used quite well this year so far. Mowing the yard, splitting wood, carrying blocks, using the wheel barrow, doing bark, and concrete edging, dealing with blades (like lawn mower blades). They have a white pile thermal insulation which is handy in the colder temperatures. We usually get around six pairs at a time. Unfortunately, I cannot wear anything smaller than an X-Large or XX-Large.
“Check Price of these Kinco Gloves”
Always wear Eye Protection
(2) Safety Goggles and/or Safety Glasses

With four different types of Eye Protection (Left to right, DeWalt Safety Glasses, Unknown Brand, WeedEater, and Goggle Style)
I split up where I keep them. First two pairs I keep in the garage, as well as the goggles. Use them when doing a number of power tools in the garage. Use the goggles when I am doing things like grinding where particles can fly under the glasses. The WeedEater glasses I keep in the shed and use for mowing, weed eating, and splitting wood.
“Check Price on Comparable Goggles I Found”
“Check Price on Comparable DeWalt Safety Glasses I Found”
Wear Latex or Rubber Gloves for Oil Change
(3) Latex or Nitrile Gloves for Oil Change

These are handy for so many different projects. I have to wear the large ones. There are lots of similar brands out there. Some slight differences in material and color, but they all work towards the same purpose, to keep lots of different material off the hands to make it easier to cleanup. Some of the projects, I use them for are: Changing Oil, Painting, Staining or spraying, Drywall mudding, and an unpleasant one, picking up the occasional dead animal to dispose of.
“Check Price on Comparable Nitrile Gloves”
Use Wood Block as one method of keeping Blade from Moving
(4) Wood Block(s)

Nothing special about this a piece of 2×6 about 18 inches long. The board works great to lodge on either side of the blade depending on if the blade is being put on or taken off.

I have the mower on the side, which I know some say is a no-no, but if you notice how nicely the wood locks into place there to keep the blade from spinning clockwise. When taking off the Blade I lodge it under the right side/edge of the blade so when it is loosened it will not move counter-clockwise. When tightening it is the left side so the blade will not move clockwise when tightening. When the socket is used to tighten the bolt it has no movement clockwise at all. One safety rule I want to mention here again is that the Spark Plug was already disconnected.
“Check Price”- (Just Kidding)
Optional Blade Lock to keep that Blade from moving
(5) Optional Blade Lock Tool/Clamp

I am intrigued by this. I do not have one myself, but found some pretty representative stock photos on this.
“Check Price of This Blade Lock“
The Spark Plug “Dead Man” Rule
(6) Disconnect the Spark Plug Before touching the Blade

There is a rumor going around that if there is residual fuel in the cylinder and you turn the blade manually, the engine could theoretically kick over and start, which may explain some folks have lost fingers. Just grab that rubber cover with enough pressure to hold and pull the connector right off the spark plug. You are now safe to work on the under carriage or blade of the mower.
Step-by-Step Instructions
Now that we have covered a couple of items:
Detailed Tools Used, Detailed Material and Parts List, A Quick Parts Specification, and Safety Warning, let’s get started on the nitty-gritty. The day I took all the photos, it was cloudy, and I wasn’t sure it was going to rain, but I proceeded anyway. I pulled the Lawn mower out of the shed and got started.
“As an Amazon Associate, I earn from qualifying purchases.”
Some of the Items used under the Step-by-Step Instructions may have Amazon Affiliate links to a number of the tools or materials used.
(1) Sprayed the mower off with the Power-Jet in the Driveway
Before and After Photos for Step 1

This step was pretty straight forward, just attached the Power-Jet to the Hose in the Front and took it down to the Driveway. Took the Bagger/catcher off the mower first; then brought the mower around from the back yard. Turned on the water and gave the mower a quick spray off. I don’t believe I have ever done that with this mower before. Wow! This is a nice red color after all. It really shined up after that. The reason we wanted to do this, we wanted to see if we had any issues with the paint, or some bad rust. We did find one problem, which I will show you in the ‘Additional Items Found’ section.
“If the Power-Jet sounds interesting, please Check a comparable Price“
(2) Moved mower to back yard and attempted to scrape off bottom
Before and After Photos for Step 2

This particular mower is very stable on its side; but before tipping the mower on its side follow the ‘Golden Rule’ of mower safety. ‘DISCONNECT THE SPARK PLUG’. I needed to take this step to remove as much grass and dirt as possible and see if we have any issues under the carriage. I put on my gloves and took the scraper and removed as much material as possible. I discovered we had one small spot that has rusted through just a little. If you notice in the right picture the blade was replaced. I will be doing that in the next step.
“If the Paint Scraper, sounds like it could be useful, please Check the Price”
“If the Kinco gloves sound like a useful item please Check the Price”
(3) Removed Old Blade and put on New Blade
Before and After Photos for Step 3

Notice the small differences. The Older blade on the left is starting to see a bit of wear in a few spots. I am sure this is the original blade also, so it is about 16-17 years old.
“If a Reasonable Replacement Blade sounds interesting, please check price”
Make sure that you have the correct socket and wrench. The size is 9/16”.

“Please check out this socket set”
Spray 3-in-one High Performance Penetrating Spray (Or use 4 oz bottle) all around the Blade Center bolt. If you can get the spray up behind the blade around the bolt and cover the bolt and washer. Let it sit for a couple minutes. Enough time for some coffee or tea.

“Check out the Spray 3-in-one High Performance Penetrating Spray or 4 oz bottle”
See the picture where the block is lodged under the blade on the left side under the Safety Warnings section. When taking off the Blade I lodge it under the right side/edge of the blade so when it is loosened it will not move counter-clockwise. When tightening it is the left side so the blade will not move clockwise when tightening. When the socket is used to tighten the bolt it has no movement clockwise at all. One safety rule I want to mention here again is that the Spark Plug was already disconnected.
Place the block under the right side of the blade and lodge it in place. Use the socket and remove the Blade Center Bolt.
Once the bolt is removed, clean it up and give it a spray with the 3-in-one oil. Take the new blade and put it with the part number pointed to the dirt, insert the block to the left of the blade to lock, then hand tighten the Blade Center Bolt. Use the socket and tighten down. The blade will be on. Tip the mower over to its normal position. We are now ready to change the oil.
(4) Remove the Oil and Add New
The new looks like a light beer, while the old look like a dark lager beer. Haha.

I ran into some difficulties with this. The pump that I was attempting to remove the oil with had a hose that was just a little bigger outside diameter than what seems to work. Let me explain a bit here. I retrieved my oil storage pan and hand pump for oil or gas and removed the Oil dip stick and put it aside. I put the input hose as far into the opening the dipstick resides in as I could get it. It just wouldn’t go deep enough, so I resorted to a different technique.
I used the ‘Special Funnel’
Here is what that looks like

I simply put the cup on the ground and lined it up to tip the lawnmower part way over. The oil drained perfectly into the clear cup pictured earlier. The process took a few minutes, but no drips or leaks. (I was very lucky this time). After a few oil comparisons, I put the oil in the Oil Storage Pan and made sure there was no dripping there. The funnel was then put back roughly into the same configuration as the one pictured. I then poured 18-20 ozs of the SAE 30 oil into the funnel carefully. The funnel was then pulled out and wiped off and the cap with the dip-stick inserted and put all the way on. I waited a few minutes then pulled the sip-stick, wiped it off, then did the process again of re-installing the cap and tightening. Pulled the cap one last time and looked at the low and high marks. I was successfully between those. Hip-Hip-Hooray, I can move to changing the Air Filter.
“Check the Special Funnel Price”
(5) Let’s get Ready to Change the Air Filter
Before and After Photos for Step 5

The Air Filter was an easy change. I used a Large Standard (slotted) screw driver and took the Air Filter Cover off.

Used Air Can and cleared off area where the Filter goes, then removed old filter from cover and cleaned up the cover. Put filter back onto the cover the same way the old one sat on it. Then just line up the bottom of the cover with the three slots and slid over and lined up the screw with the hole and hand tightened. Used the Standard screw driver and tighten it back down. The Air Filter is now installed. We are now ready to replace the Spark Plug.
“Check out the Air Filter Price”
“Check out the Comparable Screw Driver Set Price”
(6) Removed Old Spark Plug and Replace with a New Spark Plug
First step is to disconnect the Spark Plug Wire. Here is what it looks like when removing the Spark Plug Wire.

Get the Spark Plug Socket for this (13/16”) and the correct wrench.

Put the socket on the wrench, and slide over the spark plug until it feels like it has seated all the way. Remove the Spark Plug.
It has been at least five years since I have done anything with the Spark Plug. I decided to just put a new one on.
Here is what the Spark Plugs look like. New on Left, old on Right

Take the new spark plug and hand tighten it onto the ‘Spark Plug Threads’ on the mower. Use the Spark Plug Socket again and tighten the Plug until it is firm, but not too tight. I am now done with the basic Repairs. If you want, you can use a torque wrench.
Additional Items Found
(1) Temporarily Fixing a Rusty Hole in Mower Deck
Before and After Photos for Additional Item 1

I discovered this Rust spot under the paint. It appears to be the only weak spot on the entire Deck. For now I used the thick Gorilla Tape to cover the hole until I come up with a way to fix.
Question of the Day: Do you know of a good way to permanently repair this rust spot? If you know of a good method please let me know in the comments.
(2) Patching a Crack in the Grass Catcher
Before and After Photos for additional Item 2

I discovered a small crack in the Grass Catcher. Not to worry, I used Gorilla tape again on the outside of the bottom of the catcher to fix the crack
Final Review
Some Final Photos
I wanted to show you some of the results after the mower was fixed.
Completed Mower

What Front Yard Looks like when done with mowing. Overall, looks OK. May need to check a few other items on the mower for a future Blog.


Leave a Reply